PowerPoint Presentation
Scene 1 (0s)
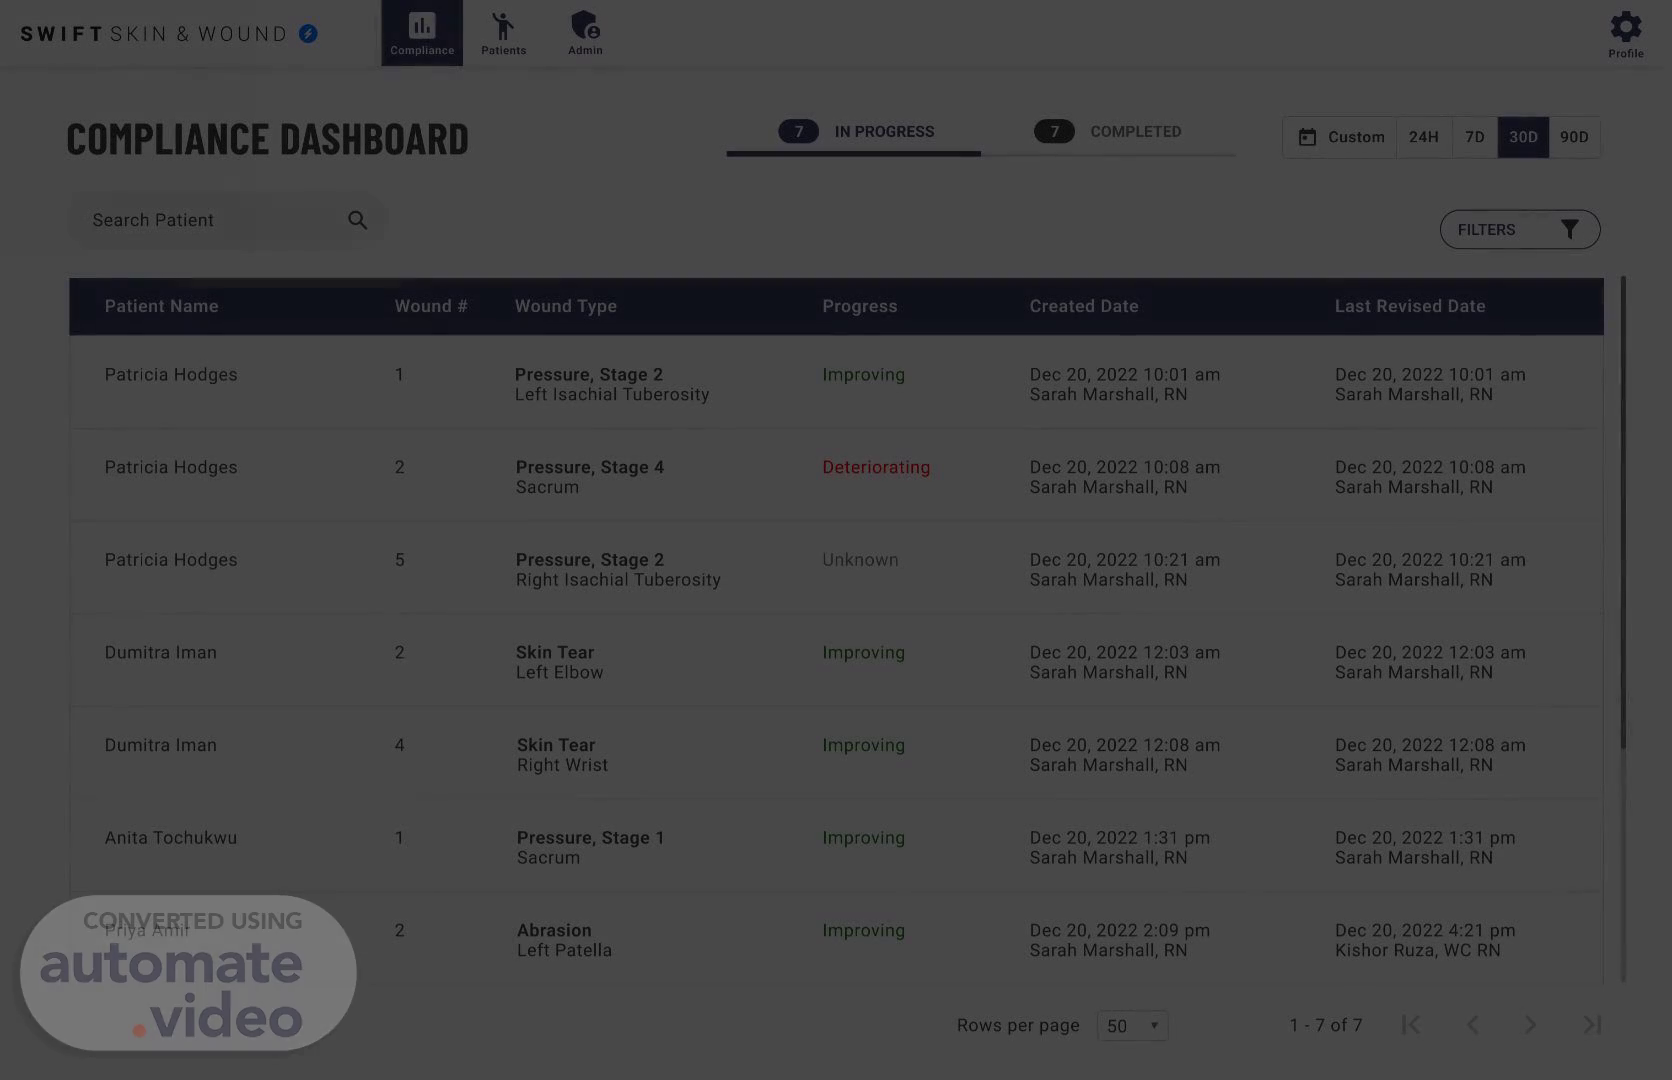
[Audio] When you first land on the Web Portal you will see the compliance dashboard. Let's explore the first key point; how to check if evaluations are complete or not..
Scene 2 (11s)
[Audio] In this view, I can see two sections, the in progress and completed buttons found here. The number indicates how many evaluations are in progress and looking at the number next to completed indicates how many are completed..
Scene 3 (26s)
[Audio] You can adjust the date range for this with the date bar on the right. As you can see it indicates 30D which means 30 days. You can select one of the predetermined date ranges or you can select a custom range using the custom button..
Scene 4 (39s)
[Audio] You can use the search bar to find a specific patients evaluation using their first or last name, MRN number, or Swift Code..
Scene 5 (48s)
[Audio] You can click on a wound evaluation to view this specific wound evaluation. This is a specific instance of an evaluation of a wound, not an entire series. When you click on this a pull out will appear..
Scene 6 (1m 1s)
[Audio] In this view you are able to view an evaluation and all key details..
Scene 7 (1m 10s)
[Audio] If you need to adjust the clinical documentation for this evaluation, click the document button. This will open the clinical documentation editor where you can then adjust the evaluation..
Scene 8 (1m 22s)
[Audio] Event history allows you to view who created and adjusted the wound evaluation. This includes who signed, edited or or used strikeout on an evaluation..
Scene 9 (1m 36s)
[Audio] Export PDF allows you to export and download this specific wound evaluation..
Scene 10 (1m 43s)
[Audio] To sign an evaluation, required documentation must be complete. Once it is, you are able to click the sign and close button. This will navigate you back to the compliance dashboard..
Scene 11 (1m 57s)
A screenshot of a computer Description automatically generated.
Scene 12 (2m 6s)
[Audio] The navigation is at the top of the screen, next we will navigate to the patient's dashboard..
Scene 13 (2m 13s)
[Audio] The patient list allows you to search for patients, add patients if applicable, open a Swift Record, and complete ADT functionality..
Scene 14 (2m 24s)
[Audio] Click the pencil icon to edit an existing patient, and click on the three dots to complete ADT functionality..
Scene 15 (2m 32s)
[Audio] You can use the search bar to find a specific patients evaluation using their first or last name, MRN number, or Swift Code..
Scene 16 (2m 41s)
[Audio] Click add patient to open the add a patient pull out..
Scene 17 (2m 49s)
[Audio] To add a patient, fill out all of the required fields and click the save button at the bottom..
Scene 18 (2m 58s)
[Audio] You can click the filter button to open up the filter pull out..
Scene 19 (3m 7s)
[Audio] The filters pull-out will look similar in all of the dashboards. Click a field to open it..
Scene 20 (3m 16s)
[Audio] Click a field to open it.. A screenshot of a medical information Description automatically generated.
Scene 21 (3m 24s)
[Audio] Click a section to activate the filter.. A screenshot of a medical information Description automatically generated.
Scene 22 (3m 33s)
[Audio] Click apply to set any selected filters onto the patient list..
Scene 23 (3m 42s)
[Audio] You can view which filters are currently applied next to the search bar..
Scene 24 (3m 51s)
[Audio] Let's select the first patient, Patricia..
Scene 25 (3m 59s)
[Audio] Selecting a patient opens their Swift Record. You can see the first wound series is selected and we are currently in the compare tab. You can add another evaluation to this using the add button..
Scene 26 (4m 12s)
[Audio] You can then see all of the evaluations selected..
Scene 27 (4m 19s)
[Audio] Clicking the list button will open up the list view. This is where you can see all evaluations in a wound series. You can click the Export button next to an evaluation to download that specific wound evaluation. You can also edit documentation using the Document button. Click the back button to go back to the patient list..
Scene 28 (4m 38s)
[Audio] From the patient list, you can navigate to the admin section from the top navigation.
Scene 29 (4m 47s)
[Audio] From the admin list, you are able to search, create a user or use filters like in the previous pages..
Scene 30 (4m 56s)
[Audio] The pencil icon allows you to edit an existing clinician, and the three dots allows you to reset a password or enable or disable a user..
Scene 31 (5m 6s)
[Audio] Clicking the Profile button will open up the profile pull out..
Scene 32 (5m 13s)
[Audio] In the profile page, you can view your information, click log out, and change your password. Click the X to exit out of this pull out and navigate back to the previous page..
Scene 33 (5m 25s)
[Audio] This video explores the basics of the Web Portal Dashboard. Your organization may also have access to reports. These reports can be used to explore details of your organizations wound care program more holistically. It is best to start looking at these reports once you feel comfortable with the basic elements in the dashboards and your organization has been using Swift for over 2 weeks..