Microsoft Word - Coffee-_Propagation_Production_Manual_13_Feb_2019_ed_LW
Scene 1 (0s)
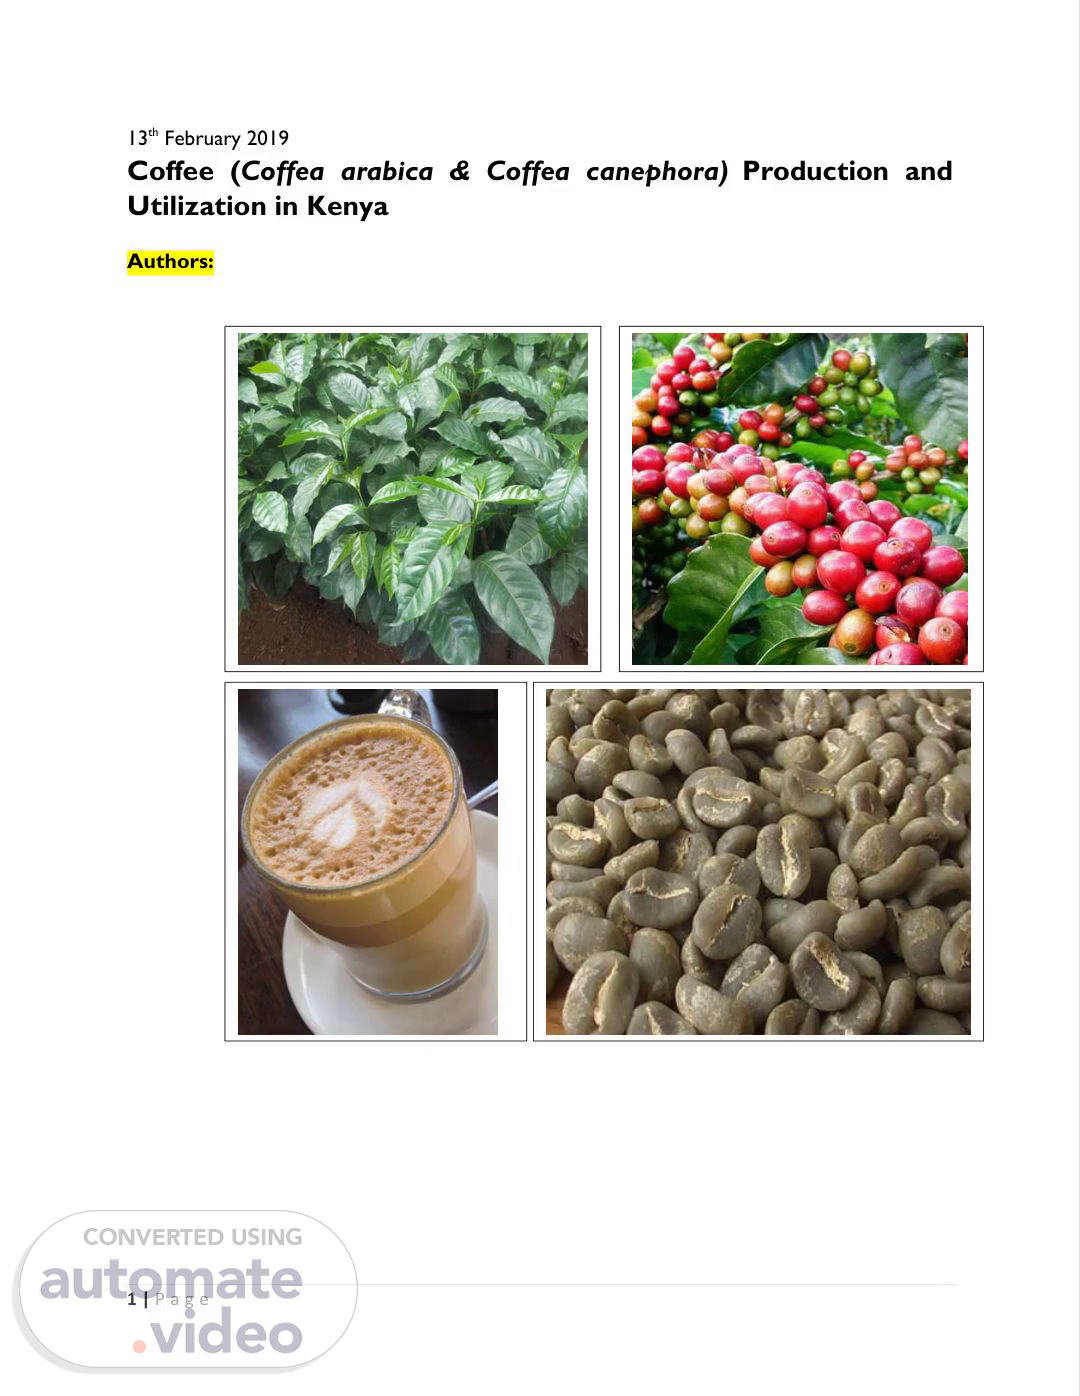
[Audio] 13th February 2019 Coffee (Coffea arabica & Coffea canephora) Production and Utilization in Kenya Authors: 1 | P a g e.
Scene 2 (12s)
[Audio] Introduction Coffee History Ethiopia is the ancestral home of cultivated Arabica coffee with wild Coffea arabica L., being the parental shrub growing naturally in the moist forest. With continuous active selection and breeding activities, many varieties like Batian and Ruiru II in Kenya have emerged with improved disease and pest tolerance coupled with high yields potential. Coffee consumption has existed for more than 1,000 years leading to the current status of being the most consumed drink to water with over 33.33 Billion cups per month and most traded commodity after oil as per 2017 statistics. Coffee propagation culture commenced in Arabia as early as 575 in Yemen and later in the 16th century in Persia. Coffee drinking was appreciated in Europe in 1615, after being brought by traders, later Germans, Frenchmen, and Italians who introduced in their colonies. The Dutch introduced botanical garden of Amsterdam that made and triggered increase in drinking and defining culture of the Europeans. Netherland and France experiences led to expansion of the coffee cultivation to other European colonies due to readily available European market. Coffee sustains over 100 million people globally and is rated among the largest export commodities in the world. Coffea arabica (arabica or highland coffee) and Coffea canephora (Robusta or lowland coffee) are the main coffee species that are commercially grown, however there are 124 coffee species existing and which have been named to date. Coffee Arabica contributes 70% of produced coffee while Robusta contributes 30% (ICO, 2016). Coffee is to date planted in over 11 million hectares in the world spread over 60 countries in the tropics. In Kenya, coffee was first planted in 1893 at Bura in Taita hills thereafter it was grown in Kibwezi in 1900 followed by Kiambu in 1904, since then coffee growing was expanded to several areas of Central Kenya, Meru, Kisii, Machakos, Mount Elgon and Rift Valley. Agricultural production The fast increasing population is the greatest challenge to the agriculture sector and natural resource management and sustainability. It is estimated that each year the population increases by an average of 90 million individuals. Agriculture sector is meant to feed the population and improve the well-being of the farmers. Kenyan economy depends heavily on agriculture with over 75% of rural livelihood depending on it and about 28% on the national GDP contribution level out which coffee contributes 0.2%. Agriculture sector in Kenya utilize over 70 % of labour force, giving 25 % of the total national GDP, 60 % total export earnings, over 75 % of raw materials for the industries and contributes to 45 % of total government revenue. Coffee is the fifth largest foreign exchange earner in Kenya after tourism, tea, horticulture and diaspora remittances. Furthermore, Coffee is mainstay of about 800,000 households most of whom are in the rural areas and hilly terrains. Rural areas are characterized by high level of poverty, low income, low education levels and key resources available that needs management. Vision 2030 outline agriculture as an important pillar to the national development plan, in fact development and agriculture in Kenya are synonymous as it.
Scene 3 (4m 10s)
[Audio] and Ethiopia. Harmonization of information, data and procedure for improved coffee production is key in the sustainability of coffee production and consistency in the livelihood for coffee value chain dependants. Guided coffee production gives positive results in terms of agricultural production quantities, community nutrition, poverty reduction and environmental management. The coffee Sector in Kenya Kenya's agriculture cannot be complete without mentioning good climatic conditions which are favourable for coffee production of high quality sought product especially in the rural areas where over 70% of the world's poor live. Coffee performance determines the livelihoods and economic status of over 800,000 households in rural areas of Kenya. This therefore means that an improved coffee performance translates to improved rural development. Coffee production Coffee production is an important economic venture world over for example in 1830 Brazilian business men shifted their business from gold to coffee basically for local consumption. This shift triggered infrastructural development including an approximate of 7,000 km railroad between 1860 and 1885 which further transportation of labour to work in the country especially the State of Rio de Janeiro and São Paulo which has favourable climate, soils, and terrain. Coffee opened Brazil to immigrants from Portuguese, Italian, Spanish, German, and Japanese nationals who were looking for better economies. The gains made by coffee trade have created a sustained economic growth in the coffee growing countries. Coffee exports are closely related to various developments in many countries namely Brazil, Colombia, Costa Rica, Côte d'Ivoire and Kenya. The coffee sector in Kenya is a key economic undertaking in terms of income generation, employment creation, foreign exchange earnings and tax revenue. Even politics at all levels cannot ignore or be ignored by coffee, not least in the race for well-paying jobs, sinecures, and contracts in the various institutions that serve as gravy trains in the coffee sector fiscal and monetary system. Kenya coffee production is categorized into two systems namely the estate and smallholder with a total of about 4000 estates and over 800,000 smallholder producers who operate and process their coffees in about 550 cooperative societies. Cooperative sector made of smallholder's farmers account for 75% of total acreage with less than half of total production. There is high production in the estate sub sector due to increased adoption of technologies demand driven extension approaches working on it hence utilization of appropriate fertilizers, agrochemicals and water supplementation at the right timing. It is estimated that five million people depend on coffee for their livelihood along the value chain which include the nursery operators, growers, agrochemical industry, millers, marketers, transporters, roasters, packers, financial institutions, insurance companies and coffee houses. Owing to its immense contribution to the economic growth of our country, coffee is one among the crops selected for commercialization in Kenya's The Big 4 Agenda. 3 | P a g e.
Scene 4 (7m 41s)
[Audio] Figure 1. Map of Kenya showing the coffee growing areas 4 | P a g e.
Scene 5 (7m 49s)
[Audio] Varieties, Areas Grown and their Attributes Table 1. Commercial Coffee Varieties Grown in Kenya Attributes Variety Areas Grown Spacing and population density Tolerant to CBD and CLR Batian All coffee growing areas 2.1 x 2.5 m (7 x 8ft) 1905 trees/ha Early maturing (18 months) Cost effective - reduces costs by 30% Ruiru 11 All coffee growing areas 2 x 2 m (6.6 x 6.6ft) 2500 trees/ha Hybrid variety Resistant to CBD and CLR Early maturing (18 months) Cost effective - reduces costs by 30% Compact growth amenable to high density planting Susceptible to Coffee Leaf Rust and Coffee Berry Disease SL 34 High altitude with good rainfall 2.74 x 2.74 m (9 x 9 ft) 1330 trees/ha Susceptible to Coffee Leaf Rust and Coffee Berry Disease SL 28 Medium to high altitude coffee zones less prone to Leaf Rust 2.74 x 2.74 m (9 x 9 ft) 1330 trees/ha Tolerant to Coffee Leaf Rust Tolerant to drought K7 Low altitude 2.74 x 2.74 m (9 x 9 ft) 1330 trees/ha 5 | P a g e.
Scene 6 (9m 39s)
[Audio] Propagation The main methods of coffee propagation are: i. Seeds ii. Cuttings iii. Grafting iv. Tissue culture Propagation by seed Coffee seeds are acquired from Coffee Research Institute With proper management, 1kg of coffee seed produces between 3000-4,000 seedlings. To ensure high germination rate, seeds should be sown immediately after collection. If not sown, the seeds should be kept in cool dry place and not for more than one day. Use 5-7cm (2-2.75 inches) deep pure clean river sand (without soil) as propagation media. To reduce germination period, de-husk the seed by use of hands just before sowing Sow the seeds at a spacing of 2.5cm by 2.5cm (1inch X 1inch) and a depth of 1cm. The centre cut should face up The seeds are then thinly covered with sand and moistened with water using a watering can. Cover the propagator with a 1000 gauge translucent UV treated polythene sheet to maintain ideal temperature and humidity. The propagators should be shaded. Apply adequate clean water regularly (ensure adequate moisture by using a finger to check for wetness) Regularly uproot any emerging young weeds The pre-germs usually emerge after 6 – 8 weeks Pre-germs are ready for potting when they have a pair of cotyledons leaves This takes about 2 -2 ½ months Sowing – centre cut Pre-germs ready for potting 6 | P a g e.
Scene 7 (11m 29s)
[Audio] Vegetative propagation Vegetative propagation is a method of producing planting materials using plant vegetative parts instead of seeds. The materials produced vegetatively are genetically identical to the mother plant. This is done predominantly on the disease resistant hybrid cultivar Ruiru 11. Clonal mother plants These trees are derived from seedlings which have undergone a pre-selection test for Coffee Berry Disease (CBD) and Coffee Leaf Rust (CLR) resistance. The selected mother trees are established in the field at a spacing of 1m by 1m. After 12-18 months, the primary branches are removed and the stems bent and pegged down in a horizontal position to encourage growth of orthotropic (vertical) shoots. Suckers grow from the dormant buds at each node, and are ready for harvesting after six months Clonal garden - young suckers Clonal garden –Suckers ready for harvesting Propagation by cuttings Harvesting of suckers should be done early in the morning when the atmospheric relative humidity is relatively high. Single node cuttings are prepared by making a cut at an angle below the node but retaining the pair of leaves The cuttings are planted in the propagators at a depth of 2 to 4 centimeters and at a spacing of 4cm by 4cm. Callus formation begins 3 weeks after planting and is complete in 5-6 weeks. Root development follows after 8-10 weeks Propagation by grafting This is the successful heeling of the union between the scion and root-stock. Grafting requires 10-12 months old seedlings (or pencil thick) to be used as root-stock. Root-stocks of other commercially existing Arabica coffee varieties are compatible with Ruiru 11 7 | P a g e.
Scene 8 (13m 29s)
[Audio] The graft union is tied with a polythene tape and the entire seedling is placed in a propagator to heal The grafting process Propagation by Tissue culture This is the generation of plantlets using plant parts such as leaves by use of growth hormones. The method is limited to highly specialized facilities/ laboratories and therefore cannot be adopted at the farm level Potting media and transplanting The recommended potting mixture consists of three parts top soil, two parts sand and one-part manure (top soil: sand: manure=3:2:1). For example, to fill 125 polybags of 5 by 9 inches, use 3 debes of sieved top soil, 2 debes of sand, one debe of well decomposed manure, 25gms TSP or 50gms SSP Put the mixture in National Environment Management Authority (NEMA) compliant potting materials, place them in rows in the shaded beds and water thoroughly. Make a hole in the centre of the pot using a pointed stick and insert the pre-germ to the level of the stem crown. For pre-germs, transplanting is done after the two cotyledons unfold, which is about 8 weeks after sowing. Weak pre-germs or those with twisted roots are discarded For cuttings, transplanting is after 8-10 weeks following propagation Carefully firm the mixture around the stem 8 | P a g e.
Scene 9 (15m 6s)
[Audio] Poly bags with potting mixture Pre-germs transplanted Maintenance of seedlings Water seedlings regularly depending on prevailing weather conditions. Avoid overwatering which predisposes seedlings to damping-off. Other factors that may cause damping off includes; poor potting mixture, over shading and acidic soils Regularly uproot any emerging young weeds Apply foliar feed as recommended after 4 months following transplanting Control diseases such as damping-off and Brown eye spot by using 0.5% copper solution. Control the common insect pests like green scales, giant looper and leaf miners as they occur Hardening of seedlings Gradually reduce shade and the watering frequency to harden the seedlings at 7-8 months after potting. Completely remove the shade one month before planting Ideally, seedlings are ready for transplanting they have 1-2 pairs of primary branches. This is around 8-10 months after potting Land preparation Prepare the land well in advance, digging out all tree stumps, roots, bushes and grasses. Land cleared of trees within 6 months should not be used for coffee planting because of the risk of Armillaria, a fungal disease which causes root rot Ensure soil analysis is done to determine the inherent soil condition Make terraces or other soil conservation structures where the land has steep slopes Protect bench terraces by planting grasses e.g. Blue grass (Paspulum notatum) on the bench faces Layout and preparation of planting holes Layout and peg the planting points along the contours at the appropriate spacing 9 | P a g e.
Scene 10 (16m 56s)
[Audio] Space holes at 2.74m x 2.74m (9ft × 9ft) for SL 34, SL 28 and K7; 2m × 2m (6.6 ft x 6.6 ft) for Ruiru 11 and 2.1m x2.5m (7ft x 8 ft) for Batian variety. Dig the planting holes during the dry season, at least three months before planting/ onset of rains Planting holes should measure 60cm x 60cm x 60cm (2ft × 2ft × 2ft) Place top-soil (first 15cm or 6 inches) and sub-soil (15cm-60cm or 6"-24") separately. 1 month before planting fill the holes with the top soil mixed with a minimum of 1 "debe" (20 litre bucket) of well decomposed manure or well-rotten coffee pulp, 100g TSP or 200g SSP. If the soil pH is below 4.4, add 100g of lime to the mixture, otherwise add as per soil test results. Slightly mound the mixture in the holes to allow for settling Place pegs at the centre of the holes and align appropriately Planting hole Field planting Obtain coffee seedlings from KALRO - CRI or any licensed coffee nursery Select seedlings that are about 30 - 40 cm tall, with 1 - 2 pairs of primary branches and that should have undergone sufficient hardening Plant the seedlings at the start of the main rain season after the soil has become wet up to about 60cm (2ft) deep Remove the pot carefully to avoid disturbing the root system Open the soil mound sufficiently at the top centre to accommodate the tap root and other roots and plant the seedling without burying the stem crown Fill in the soil and press firmly without compacting and avoid stepping on it 10 | P a g e.
Scene 11 (19m 11s)
[Audio] Avoid deep planting as this usually interferes with nutrient uptake leading to stunted growth Deep planting Correct planting Field maintenance of young coffee Mulching Young coffee requires mulching in order to conserve moisture, suppress weeds and moderate soil temperatures Apply the mulch around the stem and ensure that it does not come into contact with it to avoid incidences of insect pest attack Mulching in young coffee Watering During dry spells, water the seedlings at least two times a week until they are well established. Avoid over-watering to encourage proper root development. 11 | P a g e.
Scene 12 (19m 51s)
[Audio] Weed Management Undertake hand weeding around the young trees. Use implements like the half-moon jembe to weed in between the rows In the event that there are stubborn weeds like couch grass, cover the seedlings (with a bucket or bag) before spraying the weeds with a suitable herbicide Nutrition Apply 50g of CAN per seedling six months after planting After one year, apply 80g of NPK e.g. 17:17:17 per tree one and half year apply 100g of CAN At two years, apply NPK at 125g per tree. Subsequent applications should be as per the recommendations. For the first two years, abort the flowers to encourage vegetative growth Intercropping Intercropping can be undertaken within the first two years after establishment. Suitable intercrops include short leguminous crops such as Field beans, tomatoes and Irish potatoes Plant the intercrops using a recommended fertilizer preferably NPK fertilizer such as 17:17:17 Plant the intercrop at the middle of the inter rows at least 2 feet away from the coffee rows/stem. Young coffee intercropped with field beans 12 | P a g e.
Scene 13 (21m 16s)
[Audio] Crop Management Coffee Nutrition For high yields and quality, there is need for adequate and timely supply of both macro and micro nutrients. The nutrients can be supplied from various sources such as fertilizers, manures or composted plant materials. Fertilization programs are based on established inherent soil fertility characteristics and expected production level. Essential nutrients in coffee Macronutrients – elements required in large quantities. They consist of the primary macronutrients required in relatively higher quantities such as Nitrogen (N), Phosphorous (P) and Potassium (K) and the secondary macronutrients required in moderately high quantities such as Calcium (Ca), Magnesium (Mg), and Sulphur (S) Micronutrients - elements required in very small quantities but are essential for plant growth. They include Zinc (Zn), Copper (Cu), Boron (B), Iron (Fe), Manganese (Mn), Molybdenum (Mo), Chlorine (Cl) Role of macro and micronutrients and deficiency symptoms Importance of macronutrients Nitrogen (N) Essential for vegetative growth Increases tree bearing capacity Enhances bean size Phosphorus (P) Essential for roots and bearing wood development Promotes early berry maturity Increases bean density Potassium (K) Crucial in glucose transportation from the chlorophyll to storage tissues – roots, stems and branches Promotes healing of injured plant tissue especially after picking, pruning and hail storm damage Essential for berry development – enhances bean size (berry length) hence raises the proportion AA and AB grades Regulates evapotranspiration pull i.e. the opening and closing of stomata thus the loss of water through the stomata and the uptake from the soil Enhances mucilage formation and ripening Magnesium (Mg) 13 | P a g e.
Scene 14 (23m 33s)
[Audio] A major constituent of chlorophyll which facilitates the making of plant glucose which in turn makes all the biochemical constituent of the plant – starch, amino acids, vitamins and the plant tissues Enhances bean colour (Bluish-Green colour) Initiates root formation Calcium (Ca) Facilitates growth of apical and root terminal points – intensifies flowering density Essential for vegetal and floral bud formation – it's a constituent Manages the lyophilic series - directs the overall ratios of nutrients uptake Plays a key role in bark formation – its constituent of the bark tissue Deficiency symptoms Nitrogen deficiency overbearing die-back due to of N deficency Phosporous deficiency 14 | P a g e.
Scene 15 (24m 33s)
[Audio] Magnesium deficiency Potassium deficiency Importance of micronutrients Zinc (Zn) It is the only known metallic plant hormone which: Boosts flower initiation and formation Enhances fruit set and leaf size Sets the inter-nodal spacing on the branch and the stem Enhances phosphorus uptake and utilization Determines the leaf symmetry Boron (B) Enables flower fertilization by facilitating pollen germination through the stigma to the ovary. Consequently, optimal flowering and fruit set are realized i.e. it minimizes flower abortion Manages the utilization of water in the plant together with potassium. Consequently, it regulates the uptake of water from the soil together with potassium Promotes shoot and root growth Facilitates protein and sugar synthesis from glucose Iron (Fe) and Sulphur (S) Helps in the production of chlorophyll which is required in glucose formation Promotes bean colour (lack of iron leads to amber beans) Together with copper, iron facilitates energy transfer processes during photosynthesis Molybdenum (Mo) Facilitates translation of pinheads to expanding berries without abscission i.e. abnormal drop of the pinheads Deficiency symptoms 15 | P a g e.
Scene 16 (26m 5s)
[Audio] Zinc deficiency Boron deficiency Iron deficiency Sources of macro and micronutrients Inorganic fertilizers Compound Fertilizers (NPK) These are granular, mechanically mixed homogeneous fertilizers with multiple nutrients. Examples of compound fertilizers are 17:17:17 and 20:10:10 If two or more nutrients are limiting in the soil, it's economical to apply a compound fertilizer. One of the annual N-fertilizer applications should be replaced with a compound fertilizer at a rate sufficient to supply the same quantity of Nitrogen Nitrogenous Fertilizers Sources include Ammonium Sulphate (AS), Calcium Ammonium Nitrate (CAN), and Urea The choice of Nitrogen fertilizer depends on the soil reaction (pH) Phosphate Fertilizers Common sources include Single Super Phosphate (SSP), Di-Ammonium Phosphate (DAP), Triple Super Phosphate (TSP) and Phosphoric/phosphorous acid The choice of a Phosphatic fertilizer depends on the soil reaction (pH) DAP contains both Phosphorous and Nitrogen but has an acidifying effect. It is only recommended for use in soils with high pH and high levels of potassium. Continuous use of DAP without soil analysis can lead to big cherries without beans. Avoid using DAP unless recommended after soil analysis Potassium Fertilizers Sources include Muriate of Potash, Sulphate of Potash and organic manure (coffee pulp, Napier grass and cattle manure) Foliar Fertilizers These are formulations of soluble fertilizers usually applied on the foliage of the coffee tree to supplement soil applied fertilizers with the aim of: o Correcting nutrient deficiency 16 | P a g e.
Scene 17 (28m 7s)
[Audio] o Supplementing nutrient availability where soil nutrient uptake is impeded during dry weather or cold spells o Apply when evaporation is low, preferably mornings or evenings, when it is not hot Organic fertilizers Consist of manures, mulches and composts Boma manures are livestock organic waste made from accumulated dung from cattle pens and bomas Farmyard manure (FYM) is made from a mixture of farm plant residues and daily accumulation of dung. Periodic turnings of the boma and FYM leads to a fine livestock manure. The latter is often richer in potassium. Compost is made from decomposed organic materials derived from plant residue Mulches are plant materials applied directly on the soil surface The benefits of all these include: o Improvement of soil structure o Improvement of soil porosity/aeration - ability of the soil to hold optimal water and air o Lowered soil bulk density hence improved P uptake o Moderation of top soil temperatures o Minimization of top soil moisture loss o Increment of microbial activity o Suppression of weed/insect pests o Soil erosion control To avoid inducing nutrient imbalances, the mulching material to be used should be guided by the soil nutrient status. Examples of manures and the nutrients they supply: o Cattle manure - rich in Nitrogen and Potassium o Poultry manure - rich in Phosphorus and Nitrogen o Coffee pulp - rich in Potassium and Nitrogen o Sisal waste - rich in Calcium The amount of nutrients released to crops depends on: o Nature and origin of materials o Level of decomposition o Weather conditions o Storage condition - exposing the manure to direct sun or rain leads to loss of Nitrogen. Fertilizer Application Appropriate fertilizer types and rates depends on overall fertility status of the soil and can be determined by undertaking soil analysis. N.P.K application 17 | P a g e.
Scene 18 (30m 31s)
[Audio] Apply 6 months before the main flowering (April for October/November flowering and October for March/April flowering) at the rate of 250g/tree to allow the plant to absorb adequate amount of P. P absorption is a slow process for dicots Apply 2 weeks after the onset of rains to allow the feeder roots to develop Apply on at most 20cm wide ring along the drip line and incorporate shallowly in the soil. Alternatively, scoop some soil, apply then cover shallowly (1 – 2 inches) with soil. The latter is more efficient Boron/Zinc application Apply a foliar mixture of Zinc and Boron at the rate of 2 - 3kg of each per Ha (40 - 60 g of each/20 litres of water) 2 – 3 months before the main flowering Nitrogen application Apply Nitrogen fertilizer (CAN/ASN) after the main flowering, two weeks after the onset of rains at the rate of 300g/tree per year For East of Rift Valley, apply in 2 equal splits at 3 - 4 weeks' interval (150g per application) In West of Rift Valley, apply in 3 equal splits at 3 - 4 weeks' interval (100g per application) Apply the fertilizer in at least a 30cm wide ring starting from the drip line towards the stem If trees are carrying a heavy crop, apply a foliar fertilizer rich in Nitrogen during the dry or cold spell. For example, apply Urea 46% N at the rate of 10kgs/ha (10kgs in 1000 lts of water or 200g per 20lts of water) or other foliar formulations rich in Nitrogen. A better practice will be to use a foliar rich in NPK Manure application Apply 1 - 2 debes of well decomposed manure/coffee pulp once a year during the dry weather, a month before the rains Dig a shallow furrow ring (4 – 6" deep), 30cm wide, starting from the drip line towards the stem. Apply the manure and mix with soil COMPOSTING PROCEDURE Compost is made from on-farm plant residues such as postharvest remains, weeds, tree litter fall, fodder/forage crops, coffee pulp, kitchen waste and other biodegradable materials. To assist in composting, EM (Effective Micro-organisms) can be used. This is a culture of micro-organisms that aids rapid breakdown of organic materials to release nutrients. The stock culture is termed as EM1 and is used to generate the working culture - EM2 as follows: Mix 1 litre of EM1 with 1 litre of Molasses and 20 litres of water. Let the mixture ferment for 7 days 2 litres of EM2 can be mixed with 100 litres of water for use in compost making For large scale compost, prepare ground of 100ft by 4ft wide. This should be done in areas free from flooding and run-offs Line the composting depression with a strong polythene sheeting 18 | P a g e.
Scene 19 (33m 53s)
[Audio] Stack the materials into 2ft thick layers Apply the diluted EM2 solution and repeat the layering until approx. 4ft high Wet each layer with adequate amount of water Compress the layers and cover with polythene sheet and apply a thin layer of soil on top Incubate for 3 weeks. After 3 weeks, start and continue turning and rewetting biweekly to aerate the mixture evenly Poke in a thermocouple regularly to monitor the compost temperatures or use a stick to feel the temperatures The decomposition process is complete when the mixture no longer feels hot Let the process continue for two months after which the compost will be ready for application to the field The end point is determined by a 66% reduction from the original volume Apply 5 -10kg of the compost per tree depending on the canopy size For small scale compost, make a hole 5ft by 5ft but the horizontal length depends on the availability of the composting materials and undertake the process above Apply the compost from the first hole after two months and restart filling all over gain To ensure a continuous supply, undertake the procedure repeatedly EM is readily available at Agrochemical shops Fertilizer application schedule for late main crop areas Oct Nov Dec Jan Feb Mar Apr May Jun Jul Aug Sep Main flowering Initial expansion Final expansion/maturation NPK CAN Zinc sulphate Solubor Lime Lime Manure Manure D b /t The key areas for the late main crop are – Central region, Upper Embu and West of Rift Note: NPK application in West of Rift valley should be done in August or September depending on the start of rains 19 | P a g e.
Scene 20 (35m 54s)
[Audio] Fertilizer application schedule for early main crop areas Oct Nov Dec Jan Feb Mar Apr May Jun Jul Aug Sep Main flowring Initial Crop Expansion Final expansion/maturation CAN NPK Zinc sulphate Solubor Lime Lime Manure Manure The key areas for the early main crop are – Meru, Machakos, Taita, and Oloitoktok regions Note: Trees carrying a heavy crop should be supplied with adequate nitrogen. The application of nitrogen should be based on expected production. The table below gives a guideline on the amount of nitrogenous fertilizer to be applied for various levels of production. Fertilizer application rates based on production Amount of crop estimated in the current season Kg N/ha Grams of fertilizer/ tree Kg of fertilizer/ha per year 21% N 26% N 21% N 26% N Less than 1000 kg clean coffee per hectare (5 kg of cherry per tree) 80 330 260 390 310 1000-1500 kg clean coffee per hectare (5 – 7 kg of cherry/tree) 100 358 290 476 385 1500–2000 kg clean coffee per hectare (7– 10 kg of cherry/tree) 100 – 150 358 - 538 290- 434 476 - 715 385- 577 Up to 200 716 578 952 769 Over 2000 kg clean coffee per hectare (over 10 kg of cherry /tree 4.6 Soil sampling and analysis Soil sampling entails collecting representative samples (random sampling) from the whole farm for the purpose of analysis. It should be done during the dry season When sampling, ensure you have two containers, a fork jembe or a panga and packaging bags (for the sample) 20 | P a g e.
Scene 21 (38m 40s)
[Audio] Take samples from the various parts of the farm. Collect samples outside the tree canopy between 4 trees At the sampled point, dig out and place the top soil (first 6") separately from the sub soil (6 – 18"). Mix the top soil and the sub soil separately and take 1 or 2 handfuls from each and put in separate containers. Repeat this at the other sampled points Thoroughly mix the soil in each of the containers and take a sample of about 1kg of top soil and 1kg of subsoil Put the topsoil and subsoil in separate packages and label appropriately giving your name, location and address (Postal and email). Send the samples to CRI At least 5 sampling holes (cores) should be dug for a small farm of 1 acre and below. For larger farms add 2 – 3 cores per every additional acre Undertake soil analysis every 2-3 years in order to determine the type and quantities of fertilizers to apply Soil sampling tools and process Liming Apply lime as advised in the soil analysis report Where soil analysis has not been done and there is an indication of high acidity (e.g. presence of fern and poverty grass), apply lime at 250g/tree each year in order to attain a suitable soil pH (4.4 – 5.4) Broadcast the lime along the rows during the dry weather 21 | P a g e.
Scene 22 (40m 16s)
[Audio] . Lime broadcasted along coffee rows Irrigation in Coffee Irrigation is the artificial application of controlled amounts of water to soil at predetermined intervals in order to make up for inadequate rainfall for the purpose of increasing the cropping level. It is done to supplement rainfall especially when the tree is carrying a heavy crop. Irrigation may be done through drip, overhead, basin, under tree or bottle irrigation. Benefits of irrigation Increases production by up to 50% especially when rains are below normal Increases the bean sizes hence the proportion of premium grades and thus enhances quality It can be used to induce flowering It protects the tree from damage arising from overbearing when there is drought It allows ground fertilizer application in case of rain failure Types of irrigation Drip irrigation – this is the most preferred type of irrigation since it is economical in water usage. Water is delivered through laid out drip lines that have equally spaced openings Overhead irrigation – the use of sprinklers to apply water above the coffee bushes. It is the most uneconomical in water usage and predisposes the coffee trees to disease attacks. It is also expensive to run Basin irrigation – holes are dug between the coffee trees and water is applied into holes Under tree irrigation – This is preferred where CBD is severe to avoid wetting the canopy. It involves use of small sprinklers to apply water under the trees Bottle irrigation – This is ideal for small scale farmers and involves the use of bottles to apply water under the tree canopy 22 | P a g e.
Scene 23 (42m 3s)
[Audio] Overhead irrigation Drip irrigated coffee Cobalt chloride kit Basin irrigation Critical periods to irrigate Coffee needs to be irrigated when: Moisture content is inadequate for the young coffee Flower buds are fully formed but there are no rains Pinheads are breaking dormancy (7th week from fruit set) but there is moisture deficit Rains fail during the ripening stage Trees are under stress due to drought Note: Moisture deficit testing kit (cobalt chloride disc method) is used to determine whether to irrigate or not. On average, if time taken by the disc to change from blue to pink is 5 minutes or more, there is need for irrigation. 23 | P a g e.
Scene 24 (42m 53s)
[Audio] Important aspects of irrigation Irrigate fields that are weed free Calibrate the amount of water being applied by collecting water from the discharge point for a given period of time Repair leaking pipes and joints Ensure the pump and the whole irrigation system is working properly – check the foot valves, sluice valves and the return valves Canopy Management in Coffee Canopy management is the overall process of ensuring optimal production of the bearing wood in order to maximize annual regular cropping. It includes pruning, tree training, handling, desuckering and change of cycle. Benefits of Canopy Management Maintains a suitable crop: leaf ratio Opens the tree to sunlight which stimulates flowering Encourages growth of new stems and crop producing branches Reduces pests and disease susceptibility Helps to reduce over-bearing and dieback Reduces biennial cropping Maintains an appropriate tree shape Rejuvenates the coffee tree Coffee Tree Training Systems There are two training systems in coffee namely capped and uncapped (free growth) system:- The capped system involves cutting the heads at a height not exceeding 6 feet from the ground while in the uncapped system, the apical stem growth is maintained The free growth is appropriate for smallholder, small estates and medium estate farmers while the capped system is appropriate for the mechanized plantations 24 | P a g e.
Scene 25 (44m 31s)
[Audio] Capped system free growth system Benefits of uncapped tree system It is cheap, simple and quick to manage. Good for crop control and prevention of over-bearing. Stems replacement and change of cycle is easy. It bears crops mostly on primaries which give bigger beans of higher quality. Limitations of uncapped tree system Tree breakages are common especially with delayed change of cycle. Picking and spraying is difficult on tall trees. Irregular growth of trees in a field. Rotting of stumps with age. Benefits of capped tree system Easy picking and spraying at convenient uniform height. Limitations of capped tree system Pruning is complicated, slow and requires skilled labour. Top branches liable to scorching without shade Pruning Pruning is a process through which undesired branches are removed in order to concentrate growth on the wanted branches and it is normally carried out after the main harvesting. Unhealthy trees due to die-back should be pruned only after new vegetative growth. 25 | P a g e.
Scene 26 (45m 44s)
[Audio] Un-pruned coffee tree Pruned coffee tree 6.4.1 How to prune coffee under the uncapped system (free growth) Remove all primary branches touching the ground Open the centre by removing all the secondary branches within 9 inches (22.8cm) for traditional varieties and 6 inches (15cm) for Ruiru 11 from the main stem. Remove all the interlocking primaries After the third main harvest, maintain a bearing height: 5.5 feet for coffee in the coffeetea zones, 5 feet for main coffee zones and 4.5 feet for marginal coffee zones. Remove the old primaries below the above recommended bearing height Allow 4 non-cropping secondary branches per primary and 2 more bearing ones for medium and low altitudes Remove the interlocking primaries spirally, one from each alternate head especially for Ruiru 11 Remove all the dry branches Remove all secondary branches growing upwards, inwards and downwards Cut back primaries to ensure they do not grow beyond 3 feet Maintain 2 or 3 bearing heads per stem Too many heads correct number of heads 26 | P a g e.
Scene 27 (47m 7s)
[Audio] Well pruned primary branch How to prune coffee under the capped system Has a fixed bearing head, hence the crop is mostly borne on the secondary branches and tertiaries. Capping is done at 1.83 metres (6ft) from soil level. Cut back primaries to maintain a length of 2.5 feet. Primaries carrying a crop should not be more than one metre long. Cut off secondary branches, tertiaries and laterals which have carried two crops to encourage new laterals. Leave 4 bearing secondary branches and 2 non-bearing ones on one Primary. If possible leave only one secondary on each node on alternate sides of primary. Remove secondary branches and laterals growing upright or within 15cm (6 in) towards the main stem Always remove suckers unless wanted for change of cycle. For capped multiple stem remove all inside primaries. Handling and de-suckering Handling involves thinning out of the young shoots that develop after rains or irrigation De-suckering is the removal of suckers on main stems and at the base of the trunk Handling can be done at any time but mainly at the end of the rain season De-suckering can be done at any time but at least every 3-4 months for the uncapped system and every 2 months for the capped system Replace the non-bearing secondary branches which have matured with young shoots. Do not remove those carrying a crop Do not allow suckers to grow unless they are for change of cycle or replacement of broken bearing head(s) 27 | P a g e.
Scene 28 (48m 49s)
[Audio] Change of cycle A process of rejuvenation (renewal) of the old bearing heads with new ones. This can be done through gradual replacement or clean stumping. This should be preferably done after every 5 major main crops Uncapped (free growth) Start preparing for change of cycle 18 to 24 months before heads are to be cut off. Cut off the inside primaries leaving those within 1.5-2.5 feet from the top. This will make the heads to bend outwards Allow suckers to grow in the main stem at about 12 to 18 inches from the ground When suckers are about 18 inches high, select 4 strong, health and well-spaced suckers and cut off the rest. Just before the long rains, cut off 1 sucker leaving 3 to develop into new heads One year before cutting the old stems, prune off all the primaries inside the main stems Remove one head each year starting with the one on the sunrise side. Cut off at an angle of 450 slanting outwards Change of cycle can be done by clean stumping where all stems are cut to allow for regeneration of new suckers. The suckers are progressively selected to allow for development of up to 3 bearing heads Change of cycle in a capped system Change of cycle is done after 5 cropping years In case there are 3 heads per stem start the process by removing the head facing the sunrise side Side prune the remaining heads on the sunrise side to allow adequate light at the base of the stem Allow suckers to grow in the main stem at about 12-18 inches from the ground The rest of the procedure is as for the uncapped Undertake stem surgery whenever necessary to remove the dead wood and create space for sucker expansion New suckers developing 28 | P a g e.
Scene 29 (50m 45s)
[Audio] Top-working Top-working is varietal conversion that involves converting disease susceptible mature trees of Arabica coffee into Ruiru 11/Batian without uprooting and replanting. Methods used in top-working Side wedge grafting that leaves the upper portion of the root stock as a breather -gives rise to weak stems Whip and tongue grafting-done on pencil thick suckers and is the most common method Bark grafting -done on the side of the main stem and gives rise to weak stems which can easily break off Top-work during cool and wet weather to achieve best results How to top-work Top working procedure: Induce sucker growth on the trees to be converted by side pruning in September to October or January to February When the suckers are six months old, they will be approximately pencil thick, hardened and suitable for grafting Select 3 to 4 healthy suckers per stem originating from as near the ground as possible (46 inches) and graft with single node scions of Ruiru 11 or Batian bearing a pair of leaves Tie the graft union with a tape to keep the scion in place and to prevent fungal infections Lower a milky tube to enclose the grafted sucker and tie the lower open end tightly just below the graft union Pour a little water (approximately 50ml) carefully into the polythene bag maintaining its level below the graft union. The water helps to maintain a high relative humidity for enhanced healing Remove the bag when the graft union is completely healed (after about 6 months) Remove the tape tying the graft union Remove the old stems when the grafted suckers start bearing Infill with the selected variety to achieve the recommended plant population for the new variety 29 | P a g e.
Scene 30 (52m 40s)
[Audio] Top-working procedure Benefits of top-working There is no interference with normal cropping pattern The farmer saves on the cost of uprooting old bushes and establishment The well-established root system of old stumps prevents lodging which may occur when young trees carry a heavy crop Gets into production faster than through -uprooting and replanting Increased plant population per unit area especially where compact varieties are used It leads to high returns as a result of foregone fungicide costs 30 | P a g e.
Scene 31 (53m 19s)
[Audio] Weed Management in Coffee Weeds compete with coffee for nutrients, light and moisture. This leads to production of less yields and low quality coffee grades like C, T, TT and defects like lagged beans and pods. Weeds also act as alternate host to some coffee pests making their management difficult in un-weeded fields. There are two types of weeds, annual and perennial. Their management includes mechanical, cultural, chemical and integrated weed management strategies. Economic importance of weeds A weed is plant that grows where it is not wanted. It has the following effects on coffee:- Competition for moisture, nutrients and light Lowers quality and quantity Serves as alternate host for coffee pests Interferes with field operations Timeliness in weeding Effective weed control depends on timely application of the control methods that should be done before:- Weeds get too big and the root system makes them difficult to pull out Weeds can seed adding to the weed problem (fourth leaf stage) Fertilizer is applied which would otherwise be taken up by weeds Mulching is done Well weeded coffee Un-weeded coffee Common types of weeds Weeds are classified either as annual or perennial weeds. 31 | P a g e.
Scene 32 (54m 41s)
[Audio] Annual weeds These are weeds that complete their vegetative cycle within one year and are easy to control e.g. gallant soldier, black jack and Mexican marigold Perennial weeds These are weeds that persist over seasons and are difficult to control e.g. Kikuyu grass, nut grass, wandering jew, oxalis and couch grass Methods of weed control Weed management in coffee can be achieved through mechanical, cultural, chemical or a combination of any two or more strategies hereby referred to as Integrated Weed Management (IWM). Mechanical This involves:- Hand hoeing - done shallowly to avoid damaging root hairs by using a hoe (jembe) or a panga. Forking - should be done every 2 – 3 years mainly to break hardpans and enhance soil aeration. This is best done during the dry season to aid in management of difficult weeds Slashing - appropriate when the soils are too wet and the use of a hoe is difficult. Care must be taken not to injure the trees as this would predispose them to Fusarium infection. Tractor drawn mower – this is economical on large scale operations Cultural This involves use of traditional practices such as mulching, close spacing and cover crops. Chemical This entails use of herbicides which are either systemic or contact in their mode of action. Systemic herbicides control both annual and perennial weeds Contact herbicides control the annual weeds Chemical control should be applied only as the last option For effective chemical control, it is important to use recommended spray equipment, motorised sprayers or knapsack sprayers and most importantly the selection of nozzles. The nozzles should be wedge shaped as opposed to cone shape. These will cover large swathes as well as ensuring chemical does not drift to coffee plant. Sometimes it is important to use a shield to avoid any chemical drift. Integrated Weed management This is a combination of any two or more of the methods mentioned above. It is most effective, cost friendly and efficient as it is directed by the weed spectrum present in a particular coffee farm. 32 | P a g e.
Scene 33 (57m 7s)
[Audio] Disease Management in Coffee Classification of coffee diseases in Kenya Some diseases are major while others are minor. The main coffee diseases in Kenya include Coffee Berry Disease (CBD) Coffee Leaf Rust (CLR) Bacterial Blight of Coffee (BBC) Fusarium bark disease (FBD) Fusarium root disease (FRD) Minor diseases are Armillaria root rot, Botrytis Warty disease, Root rot, Brown eye spot, Leaf blight and stem die back. Major Coffee diseases Coffee Berry Disease (Colletotrichum kahawae) Symptoms On flowers: Dark brown blotches/streaks on the petals. Flowers may be destroyed but loses from flower infection are generally not serious On green berries: Small dark sunken patches/lesions which spread rapidly and may cover the whole berry. Infected berries may be shed or remain on the trees in a black shrivelled condition On ripe berries: Dark sunken lesions with black dots spreading rapidly on the ripe berries (late Blight) On leaves: Brown marginal spots. However, leaf infection is not common Severe infections may cause the die-back of twigs and branches CBD infected berries Late-blight Conditions favouring high disease incidences Cool temperatures – 18-200 C High humidity - encourages spores production 33 | P a g e.
Scene 34 (58m 56s)
[Audio] Rainfall – rain droplets disperse the spores to the rest of the tree. After the dispersal, at least 5 hours of wetness on the berries are required for the spores to germinate. Rainfall occurring in the late afternoon is therefore likely to provide suitable conditions for infection Management of CBD Cultural control – Proper and timely pruning, handling and de-suckering, and regular change of cycle. This reduces the initial disease inoculum. Chemical control – Correct and timely use of recommended fungicides. It is advisable to complete the recommended CBD control program for it to be effective and to avoid development of resistance by the pathogen. Farmers should start spraying before the rains and continue until the rains and the cold spells are over Resistant varieties – New planting of disease resistant varieties or conversion of susceptible varieties to resistant ones through top working Coffee Leaf Rust (Hemileia vastatrix) Symptoms Pale yellow spots appear on the underside of the leaves at the onset of infection The spots later change to yellow/orange powdery masses Affected leaves fall off prematurely in case of severe infection. This condition may cause dieback if not controlled Coffee leaf rust Conditions favouring high disease incidences Warm and wet conditions Wind and or rain – disperses the spores After the dispersal of spores, at least 3 hours of wetness on the leaves are required for them to germinate. Only germinating spores on the lower surface of a leaf can penetrate and cause infection 34 | P a g e.
Scene 35 (1h 0m 43s)
[Audio] Management of Leaf Rust Cultural control - Proper and timely pruning and regular change of cycle Chemical control- This entails the use of recommended Copper-based fungicides. Timing is critical for the control of leaf rust and the sprays should be applied before the commencement and during the early period of the rainy season. For effective management: o Start the 1st round of sprays just before the short rains and repeat 3 weeks later o Start the 2nd round of sprays before the onset of long rains and do 2 more at 3 weeks interval o In case the infection is severe (20% of leaves have rust), it is necessary to use a systemic fungicide such as Alto or Bayleton. Do not spray more than 2 times a year as it affects production of plant hormones leading to hormonal imbalance such as the balance between floral and vegetal inducing hormones. This may affect flowering and thus production o Adhere to the spray programme. Improper use of fungicides may lead to development of resistance by the pathogen Resistant varieties - Planting of disease resistant varieties or conversion of susceptible varieties to resistant ones through top-working Bacterial Blight of coffee (Pseudomonas syringae pv. garcae) Symptoms On leaves: black soaked lesions. Leaves eventually dry out, roll inwards and turn brown but do not shed On twigs and shoot tips: die back syndrome as infection extends downwards from the terminal bud On flowers and pin head stage: If attacked, pin heads appear water soaked. Both the flowers and pin heads shrivel, turn black and the entire crop may be lost On internodes of young branches: Dying of branches above the area of infection. Infection may start at the internodes of young succulent branches or green stems as a result of hail damage or through wounds caused by sucking insects Bacterial Blight of Coffee 35 | P a g e.
Scene 36 (1h 2m 56s)
[Audio] Conditions favouring high disease incidences Cool and wet weather Injuries as a result of hailstorms and insect attack Management of BBC Cultural control - proper pruning, minimising use of high N foliar feed formulations, splitting ground N application, sterilising pruning tools (e.g. with Kerol 1% or Lysol 3% or methylated spirit), cutting off and burning infected twigs and branches, frequent desuckering and avoiding transportation of seedlings from BBC prone areas Chemical control - use of bactericides (Copper based products are most effective). During the wet weather use Kasumin Bordeaux (Copper Sulphate plus Lime at 1:1 ratio). A single spray after hailstorm to protect fresh wounds from infections is necessary Fusarium Bark Disease (Fusarium stilboides) There are 3 distinct forms namely Storeys bark disease, Collar rot and Scaly bark. Symptoms Yellowing and wilting of leaves and eventual death of the tree For Storeys bark - suckers are attacked at the base forming lesions that girdle the stem forming a bottle neck at the base For Collar rot - a cankerous lesion develops causing a constriction at the base near the ground level For Scaly bark – Rising up and flaking of the bark on mature stem especially at the point where a primary has been cut off. On old trees, this may be difficult to recognize. However, when seen on young wood or associated with cankerous regions around the base of branches or suckers, it is most likely Fusarium. Unless cankerous areas develop or dieback begins, affected stems and branches may survive Storeys bark Collar rot Scaly bark Conditions favouring high disease incidences Poor nutrient status of soil Weak trees as a result of poor establishment, drought or scorch 36 | P a g e.
Scene 37 (1h 5m 1s)
[Audio] Scars on trees due to pruning, careless slashing of weeds and herbicide damage on green suckers Excessive weed growth and mulching too close to the stem causing a warm moist micro climate around the base Failure to destroy affected trees Management of Fusarium Bark Disease Cultural control o Avoid deep planting o Keep soil pH at optimum (4.4-5.4) o Proper application of mulch (6" from the stump) to avoid Collar rot o Sterilising of pruning tools with methylated spirit o Eliminate wood boring insect pests e.g. yellow headed borer. This can be done by maintaining soil potash at optimal level as per soil analysis recommendations o Uproot and burn all infected trees having die bark from Collar rot Chemical Control o In case of storey bark disease cut off and burn affected suckers or heads. Paint the scars with a fungicidal paint (1 teaspoonful of Captan plus 150ml vegetable oil). o In disease prone areas, spray suckers raised for conversion fortnightly with Captan at 40gm in 10 litres of water from emergence until wood bark matures to about 30 cm (1 foot) from the base o For scaly bark, no action need to be taken as long as no further signs of disease develop Fusarium Root Disease (Fusarium solani) Symptoms Sudden wilting of leaves and death of the tree Infected trees may remain alive for several years but disease symptom appears once the tree is subjected to water stress. At this stage a cross-section of the stem near the soil level reveals a pink-purplish colouration, sometimes with dry rot at the centre depending on severity of infection on the tree. Conditions favouring disease incidences Injury at the time of planting High acidity in soils Chemical or mechanical injury to the roots Water logging Management of FSD Cultural control o Uproot and burn infected trees. Leave the hole exposed for at least six months before replanting o Avoid damaging the roots of seedlings during planting 37 | P a g e.
Scene 38 (1h 7m 29s)
[Audio] Chemical control o Sterilise the planting holes with a soil fumigant such as Basamid at a rate of 150gm per hole Minor Coffee Diseases Armillaria root rot (Armillaria heimii) This is a fungal disease commonly associated with new establishments where trees have been uprooted leaving residual lateral roots. The residual roots contain food substrates for Armillaria fungi to multiply. These fungi eventually infect the developing coffee roots. Symptoms Wilting and death of the leaves Death of the verticals (shoots, suckers and the stem) Subsequent death of affected trees In advanced stage of the disease, the wood of the affected tree is decomposed into a white wet mass with characteristic black zone lines running through the wood tissue Conditions favouring high disease incidences Clearing of forest without first ring barking the trees Management of Amillaria Where coffee has to be planted in newly cleared forest land, it is recommended that ringbarking of the forest trees be done 2 to 3 years earlier Removal of forest tree stumps and roots The infected tree(s) should be uprooted and replanting delayed for 2 years Other minor coffee diseases include Botrytis Warty disease, Root rot, Brown eye spot, Leaf blight and stem die back. However, these are not of major economic importance. 38 | P a g e.
Scene 39 (1h 9m 11s)
[Audio] Insect Pest Management in Coffee Globally, about 1000 insect pest species infest coffee of which 35 are known to attack coffee in Kenya. Of these, some are major while others are minor. The pests attack coffee flowers, berries, leaves, branches, stems and roots leading to reduction in yield and quality. Pests Scouting and IPM Pest scouting refers to random survey of pest presence and population level and is critical in pest management. For effective pest management, it is important to take into consideration the economic threshold levels (ETL) i.e. the pest population level beyond which if not controlled is likely to cause crop loss which exceeds the cost of control with an insecticide. To manage the pests, it is recommended that an integrated pest management (IPM) approach be practiced IPM entails combining several pest control methods such as biological (use of biological control agents), cultural and chemical (use of insecticides and bio-pesticides)) It is important to avoid unnecessary insecticide sprays in order to conserve the beneficial insects or natural enemies Classification of Insect pests Major insect pests The major coffee insect pests are Antestia Bug, Coffee Berry Borer (CBB), Thrips, Coffee Scales (Green scales, Mealy bugs), Stem Borers (White Stem Borer, Yellow headed Borer), Berry moth, Leaf miner, Root mealybug, and Giant Loopers. Minor insect pests Minor insect pests include Capsid bugs, Systates weevil, White Waxy scales, Brown scales Mites and Cottony scales among others Prevalent insect pests Antestia Bug It is a broad insect, up to 6mm long (¼ inch long), dark brown in colour with orange and white markings Symptoms and damage buds leading to abortion Rotting of beans within the berries Fan branching and short internodes on terminal growth Characteristic zebra pattern on beans that grow to maturity causing the beans to be of low quality 39 | P a g e.
Scene 40 (1h 11m 32s)
[Audio] Antestia bugs Clean coffee parchment Antestia damaged beans Management Cultural control o Timely pruning, handling and de-suckering Chemical control o Spray when the pest population reaches 2 bugs per tree for East of Rift Valley and 1 bug per tree for West of Rift Valley using any of the recommended insecticides Coffee Berry Borer (CBB) Symptoms and damage One or two small round holes appear near the apex of mature green or ripe berries. Adult females and the larvae cause damage by feeding inside the mature berries causing the inside of the fruit to rot Damaged beans has distinctive blue-green stains and may contain up to 20 larvae of different sizes 40 | P a g e.
Scene 41 (1h 12m 24s)
[Audio] Berry borers Berry Borer damage Management Cultural o Regular Pruning o Practice field hygiene by collecting infested fallen berries to avoid the berries becoming breeding reservoir for CBB o Strip all the remaining berries at the end of the harvest season. If infested, bury or burn them o Avoid over-shading in order to enhance searching capacity of natural enemies on CBB. 30% shading level is sufficient Chemical o Ensure timely spraying twice at 3 weeks' interval (15th and 18th week from the main flowering) using any of the recommended insecticides. This to apply where infestation was too severe in the previous season. Integrated method o Use of pheromone traps (Brocap traps) – The traps contain ethanol-methanol (50:50)+ acid fuchsine +Britex 80ppm mixture that attract the CBB Brocap trap 41 | P a g e.
Scene 42 (1h 13m 29s)
[Audio] Thrips Symptoms and damage White silvery patches with minute black spots on leaves, berries and green shoots Heavy infestation, cause death of leaves or total leaf fall Thrips damage Management Cultural control o Mulching, shading and irrigation o Use of sticky traps Chemical control o Spray using a recommended insecticide at ETL of 1-2 per leaf when there is drought and 2-3 when there are rains. Green scales, Mealy bugs and other scales The management of Green scales, brown scales, white waxy scales and the Kenya mealy bugs is similar. Scales suck the plant sap causing reduction in coffee production and quality. Symptoms and damage Rows of flat oval Green scales along main leaf veins and near tips of green shoots Mealy white masses of insects (Mealy bugs) between clusters of berries and/or flower buds Sticky honey dew and sooty mould growing on leaves Presence of attendant ants climbing on infested coffee trees 42 | P a g e.
Scene 43 (1h 14m 48s)
[Audio] Green scales Lady bugs Kenya mealy bugs Management Cultural control o De-suckering and removal of branches touching the ground o Proper weeding to avoid weeds becoming bridges for the ants Biological control o Natural enemies such as parasitoids, parasites, predators and fungal pathogens attack the Scales thus affecting their infestation Chemical control o Under severe infestation, spray the infested trees (spot spraying) with mineral oil e.g. white oil or DC-Tron plus (100ml in 20 litres of water) Integrated method o Combines the cultural, biological and chemical methods. Coffee trees infested by scales are banded (Chemical control) 6 inch at the base of the trunk with a recommended insecticide. Followed by removal of any branches (cultural control) touching the ground that act as the bridges for attendant ants. This creates favourable conditions for natural enemies (Biological control) to attack the scales. 43 | P a g e.
Scene 44 (1h 16m 2s)
[Audio] White Stem Borer Symptoms and damage Wood shavings extruded by larvae burrowing in the stem Ring barking at the base of the trunk Oblong holes visible on the trunks left by larvae after entering the trunk Visible round holes on trunks left by emerging adults Yellowing of foliage and eventual death of trees White borer damage and frass White borer adult and larvae Management Mechanical control o Kill the larva(e) that is already in the stem by inserting a wire/spoke into the tunnel o Physically collect and kill the beetle at the onset of rains Chemical control o Paint or spray a 90 cm band above the ground on coffee trunk with a recommended insecticide. Repeat after one year and every second year. o Insert a cotton ball soaked in an insecticide through the tunnel in incidences where the larva has entered into the stem. Yellow headed borer Symptoms and damage Wilted tips of primary branches Ejected frass (Sawdust like) visible on the ground Series of holes on the underside of primary branches and on the main stem Breaking of branches especially when trees carries a heavy crop 44 | P a g e.
Scene 45 (1h 17m 24s)
[Audio] Yellow headed borer adult Larva damage Management Cultural control o Cut off infested primaries and burn them o Kill the larva(e) already in the stem by inserting a wire/spoke at the last hole downwards o Remove and burn the heavily infested heads Chemical control o Enlarge the lowest hole and use a pen filler or an oil can to squirt in any recommended insecticide Berry moth The larva is a reddish caterpillar 12mm (1/2 inch) long when fully grown. Symptoms and damage Webbed berry clusters with one or more berries being brown, dry and hollow Berry moth adults Larva Damage 45 | P a g e.
Scene 46 (1h 18m 10s)
[Audio] Management Cultural control o Remove infested berries. Destroy them by burning or deep burying Chemical control o Spray with a recommended insecticide and repeat 5-6 weeks later if buds or young berries are being infested. Scout for the pest soon after main flowering. Leaf Miner The pest is most common in the East of the Rift Valley. Symptoms and damage Irregular brown blotches on the upper side of the leaves, covering white caterpillars of size 12 mm (½ in) long within the "mine". Leaf Minor damage Management Chemical control o Use recommended systemic insecticides that are ground/soil applied o Foliar spray Biological insecticides (Insect Growth Regulators- IGR's) Root Mealy bug 46 | P a g e.
Scene 47 (1h 19m 3s)
[Audio] Symptoms and damage Wilted and yellowish Leaves Stunted Roots that are encased in clusters of greenish and white fungal tissue White mealy bugs visible after peeling off the fungus. Management Cultural control o Uproot infested trees, leave the holes open for 3 months and replant as recommended under coffee establishment Chemical control o Apply the recommended insecticide during establishment and/or infilling o Ground application along the dripline of infested coffee trees with recommended insecticides. This to be applied when soils are wet Capsid Bug This is a common coffee pest in all coffee growing regions. Symptoms and damage Blackening of flower buds due to death of stamens and petals. Club shaped elongated style with pale green shaft and black head. Management Chemical control o Use any recommended insecticides Biological control o The nymphal stages are attacked by endo-parasites Giant Looper Giant Looper is a widely distributed pest. It is associated with heavy use of Organo-phosphates. The caterpillars are Pale grey to dark brown in colour and they resemble the twigs. They measure 5 cm (2 in) when fully grown. They move with looping motion. Symptoms and damage Young caterpillars perforate pits on the leaf surface usually on the upper side. Jagged edge leaf margins eaten by older caterpillars. Caterpillars prefer young leaves but they also feed on berries and large flower buds. Management 47 | P a g e.
Scene 48 (1h 20m 45s)
[Audio] Chemical control o Spray the infested coffee trees with recommended bio- pesticides Mechanical/Physical control o Manually, collect and kill the caterpillars Biological control o The caterpillars are attacked by various predators and parasitic wasps Other coffee insect pests Other coffee insect pests that are not of much economic importance include, Jelly grub, Green Loopers, Dusty Brown Beeetle, Fruit fly, Yellow, Green and Red Tortrix, Black Borer, Fried Egg scales, White Waxy scales, Mites, Lacebug, Tip borer, Black borer, Leaf Skelotonizer, Systates weevil, Tailed caterpillar, Stinging caterpillar, Berry butterfly and Cottony scales. These pests occur sporadically and are associated with indiscriminate use of insecticides which leads to elimination of natural enemies such as Ladybird beetles. Consequently, the pest population increases to a level warranting chemical control. Primary Coffee Processing Proper coffee processing is important as it sustains bean quality and thus assures better prices to growers. There are two methods of coffee processing namely wet and dry methods. Wet processing is the pre-dominant practice in Kenya. The process involves a series of stages and each must be undertaken in the right manner and with facilities which are in good order. The stages are: Cherry harvesting Ensure timely and selective picking of bright red cherry. Avoid picking green and underripe berries which may cause pulping and fermentation problems Use clean harvesting bags, baskets or tins Avoid dropping cherry on bare ground during picking The harvested cherry should be kept under shade to protect it from direct sun Cherry should be transported in clean containers/bags Transportation of cherry to the factory should be done on the same day of harvesting 48 | P a g e.
Scene 49 (1h 22m 52s)
[Audio] Cherry harvesting – pick only the red ripe Cherry sorting Spread the cherry on a clean material/floor to avoid contamination Remove the green, under/over ripe, dry, insect infested/diseased berries, twigs, leaves and any other foreign materials such as stones Weigh and record the sorted cherry Process the sorted out lower grade cherry (under ripes, over ripes and greens) by the dry method as Buni Cherry sorting Sorted out materials Pulping and pre-grading Pulping involves the removal of the outer red skin (pulp) of the cherry The pulping machine used should be clean, in good mechanical order and well-adjusted depending on the size of beans Control the cherry feed rate to avoid overfeed that may cause too much pulp in the parchment 49 | P a g e.
Scene 50 (1h 23m 44s)
[Audio] Pulping should be done on the same day of cherry harvesting Processing water must be clean, free from colour and odours During pulping, pre-grade coffee parchment into heavy and light beans Re-circulate processing water to enhance subsequent fermentation. Dispose off the recirculated water every day after pulping Flush the pulping system with clean water immediately after pulping Fermentation and intermediate washing This is done to break down the mucilage into simple non sticky substances which are easily washed off from the coffee beans Mucilage attracts dust, taints coffee, inhibits drying and is a media of mould growth, all of which affect bean quality. Its removal is therefore important for drying Place the different grades of parchment in separate fermentation tanks. The tanks should be shaded to protect the parchment from direct sunlight and rainfall The depth of parchment in fermentation tanks should not exceed 1 metre Drain all water and leave the parchment for at least 16 hours (depending on the weather conditions and whether re-circulated water is used or not). Undertake intermediate washing (after about 16 hours or so), then 4 to 6 hours of further dry fermentation if necessary Fermentation is complete when parchment feels gritty and is no longer slippery upon pressing between fingers. To test, put some fermented parchment in a bowl, add enough water, wash and check for grittiness Always ensure that the fermentation tanks are free from cracks and are well painted with appropriate paints which are acid resistant and compliant to health standards Well painted fermentation tanks Parchment fermentation Final washing and grading of parchment Once fermentation is complete, fill the tank with clean water, stir vigorously with paddles, drain off the water and repeat several times to assist in detaching the mucilage from the parchment Wash the parchment thoroughly on well painted concrete channels using clean water and rubber paddles/squeezers 50 | P a g e.